Travel Picture Frame
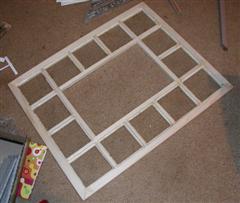
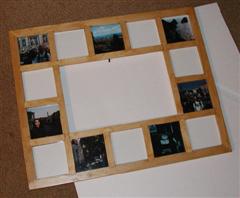
The central idea was to have one frame to hold several small pictures and then maybe a map or large picture of some type - this is how it turned out:
 As sometimes happens with things like this, a gift for someone else
also happend to turn into a gift for me. To work with the wood
propperly I just had to use a table saw. Didn't own one though - now I do :)
As sometimes happens with things like this, a gift for someone else
also happend to turn into a gift for me. To work with the wood
propperly I just had to use a table saw. Didn't own one though - now I do :)
Since the router I own is really heavy duty and has no fine wordworking bits I ended up using the table saw to do all of the bevels and notching.
John would be proud - I made a very poorly constructed game
table a year or so ago and didn't know anything about smooth
woodworking. He bought me a book on wood joining as a semi-joke gift, I
ended up using it to make this.
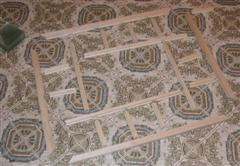
Wood
glue and clamps, a carpenters best friend. This is actually the first
attempt (which was subsiquently scrapped) - no bevels pre cut in this
one. The second attempt went together pretty much the same though.
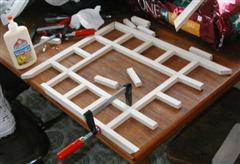
You're
supposed to wait 24 hours for wood glue to set. Since I didn't want to
screw this up I actually waited the full 24 hours - no more second
guessing manufacturers recommendations after the whole 40% fill with
foam fiasco (hooray for alliteration)
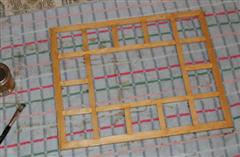
Knowing
Aimee pretty well I know she digs the whole semi-dark pine look. This
is "Honey Pine", a one shot wood stain, it worked pretty well though
you could get a major buzz off of the fumes if you were so inclined, I
elected to spend the drying time at the dog park instead.
Several
helpful sales people later (a very patient glass cutter at home depot
named Mark and two clerks at a frame shop who gave me the flexi-tabs on
the back for free) and it was starting to come together. I grabbed 7
shots that I liked from the Italy trip to sort of prepopulate the
frame. I don't expect them to stay, but it's kind of lame to give an
empty picture frame.

And
Finally the Map. It's actually a printout from Microsoft's Encarta
World Atlas. It was the easiest way to get a map of the exact area I
wanted in the exact size I wanted. The colors didn't turn out too bad
either. It's mounted on some corkboard and isn't covered by glass so if
she chooses so she can stick pins or whatever in the places she's
been/will have gone.
Some quick notes on the stuff I used and things I figured out.
- I used 1/2 inch planks of Poplar from homedepot. It was easier to work with than Pine and tended to have a better finish than the large pine planks.
- I used HP Photo Glossy Paper for all of the prints and the maps. It worked really well for the map and okay for the photos. Since the shots were somewhat dark it tended to use a lot of black ink. It may have just been my particular type of black ink, but it gives off a wierd matte "reverse reflection" when viewed from a steep angle. Not so bad once it's behind glass, but something to consider.
- Don't try and use a standard corkboard - at least not with 1/2 inch wood - they're too thick. The 1 foot square cork panels they sell at office depot work perfectly and are easy to cut to size.
- Measure how big you want the glass to be and then cut it 1/16 inch shorter. I've now got a stack of incorrectly sized glass because I tried to be too exacting. They don't slide around once the flexi-tabs are holding them in place anyway.
- Route the pieces ahead of time - part of the reason there was a second attempt is because it proved to be both time consuming and ultimiately unsuccesful to try and route out the bevels after the frame was fully assembled.
- Find nice clerks at whatever stores you shop at, explain the project, they're much more willing to cut down a single sheet of glass into 2 dozen tiny squares if you're nice to them.
